I was looking at a giant box of onions I have sitting out in my garage and I thought about how satisfying it was to grow them. Letting them go to waste would be horrible- so I better get to some cooking.
Now started to wonder; “What can I make, that would use a lot of onions?”
Some kind of sandwich? Hmm…Intriguing…

That’s a lot of onions- this is a good sized pan.
I selected about 7 medium sized onions, then sliced them about 3/8″ wide. I carmelized them with about 1/4 cup of olive oil and a few cloves of garlic. I did this on a low temperature, it took about 45 minutes or so.
Next, I looked around the garden for anything else that might be ready to be picked. We really do have a lot right now. I got some eggplant, some poblano chiles, and some roma tomatoes.

I ended up picking two more chiles after I realized I needed to roast this kind of pepper.
I roasted the chiles over an open flame on my stove. (That makes the whole house smell wonderful. If you haven’t done this, give it a try) Then I sauteed the poblanos with the eggplant, tomatoes and some salt and pepper. That took about 5 minutes.
I also prepared a yogurt with coriander, cayenne pepper and garlic salt. I topped it off with fresh sliced tomato, cucumbers, sweet green peppers and basil.

Notice the tomato is red all the way through. Store bought tomatoes are a travesty. Also, the bottom of the pita has about one full cup of the carmelized onions.
What’s the verdict? Absolutely frigging amazing. The caramelized onions were perfect. Add the other sauteed veggies, fresh veggies and yogurt…you’ve got yourself a damn good sandwich. Honestly, I walked 12 miles in Portland last week looking for something just like this, but I didn’t find it. The sandwich I made today delivered.
Some guys are out there thinking, “But that’s a veggie sandwich dude, I need to eat meat at every possible meal, and triple on my pizza!”
No you don’t.
These onions were incredible. Sweet, savory…almost like pulled pork or something. They were really good and carried the sandwich fine without any meat.
From the garden, this sandwich used:

The flower was there by accident…I’m not trying to be artistic.
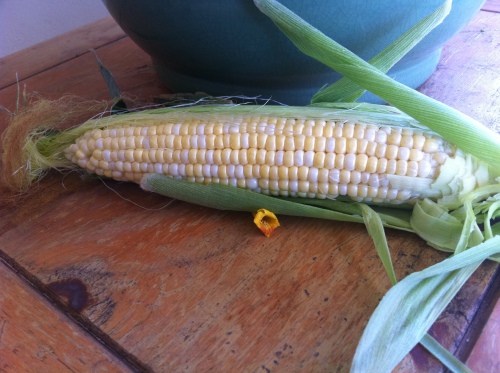
Also, I picked some corn. This variety is really good. Much better than my early maturing corn I was eating two weeks ago.

That’s Otto on the left, Felix on the right. I’m the fat one in the middle.
Posted in Uncategorized | 1 Comment »
The garden is still growing…but the weather has been strange. Rain in June…cool weather, and just a general lack of oppressive Central Valley dry heat that the tomatoes and squash love.
Because I’ve got infant twins, I have no time to write. But here are a few pictures.
In my compost pile. Not as dangerous as it looks!
I planted one seed packet of poppies a year ago. Now my yard is full.

Poppies and lavender. Quite a nice combination!
Posted in Uncategorized | 2 Comments »
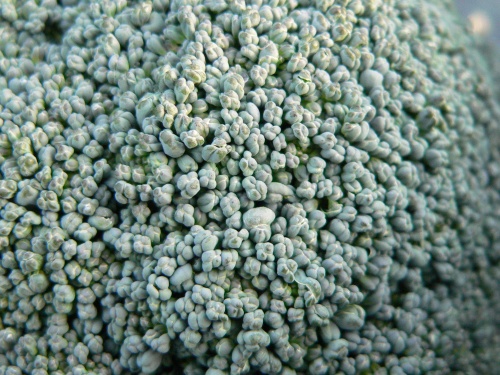
Here it is- the end of the season for my cruciferous vegetables. This final cutting of broccoli signals the end of the winter crop as the summer season heats up. It makes me a little sad. I love the winter vegetables.

A really nice and tight head of broccoli- from my garden in May!
I’m not sure why, but the entire cruciferous family really gets me going. And it’s not just because these are the ‘gassy’ veggies. I think it’s because of the flavor.
This is a bland bunch of vegetables you say? Hell no! This great family includes some really good stuff!

Tools of the trade at harvest. A large collander, and a knife.
On my final harvest, I got 4 good-sized heads of broccoli, just before they flowered. I was hoping to make some soup today, but it just didn’t happen. This is now my lunch plan for tomorrow.

Click on this picture to get a cool image to use for your desktop background!
I encourage everyone to plant a winter garden. Plant some cruciferous veggies- do it Old World style. It doesn’t matter what part of the world your people are from, your traditional dishes are full of cruciferous vegetables because they are ‘Super-Veggies.’
And don’t forget…George H. Bush refused to eat broccoli when he was President. Which means George W. probably never ate broccoli either. Can you think of any better reason to have it with every meal?
Here is a bonus picture of a garden visitor I had while picking the broccoli. There were actually two of them, I shot this one. With the camera.
Posted in Uncategorized | 4 Comments »
I’m afraid. Very afraid.
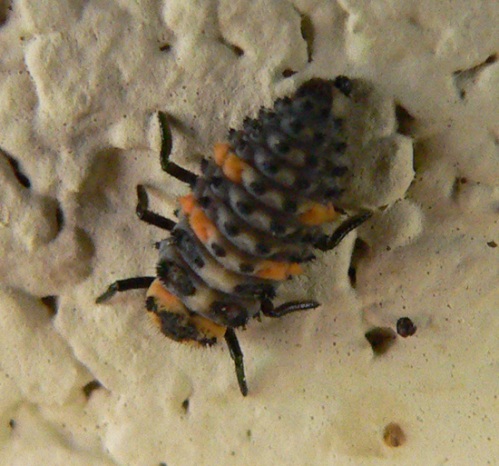
My yard and garage are INFESTED with this bug, and I don’t know what it is. Chances are, they will be eating my entire garden. I started seeing them a few weeks ago, and they look like this:

Actual size is about 1/2″ long. This one is one the stucco on the outside of my house.
These things started to show up everwhere, but I find them mostly on the side of my house. There are hundreds and hundreds of them. I am beginning to get very worried. Obviously it is a beetle of some sort.
Probably something that likes to eat my garden, then lay eggs inside the house- causing my wife to freak out.
Uh oh. I started to notice that a lot of them are turning into some sort of worm…attaching themselves to the wall and shedding their outer husk. This is it- the garden apocalypse.
I know I’ll be inundated with some form of voracious plant-eating beasts. Maybe they’ll spread some sort of lyme disease to us humans. Nature is cruel this way…and a bit disgusting also. I watched this one flick it’s ‘bottom half’ up and down as it was shedding the skin…the worm portion must have been squished into the casing, as it seemed to expand beyond the size of the original bug when it exited.
Now I’ve got hundreds of these things hanging on my house, in the garage, on plants, everywhere! Call the damn exterminators! Get a scraper!
Wait..I kind of recognize the pattern on this thing. I know I’ve seen it somewhere…
 Found this one on my roses, doing her thing.
Well look at that! My yard is infested with ladybugs! And they’re growing into adults! This must be some sort of cosmic reward for not killing the spiders my wife is afraid of.
Here’s someone else providing a little bit more information about the life-cycle of ladybugs.
I really, truly did think I had some sort of gross infestation. The ladybug larva are not as pretty as the adults. But now that I know what these are, I’m thrilled!
I’ve got more beneficial critters in the yard. 10 points to whoever can tell me what this is: (I’ve found dozens of these also..but this one, I do know.)
And finally, this guy will take care of some of the bigger pests…
The little ecosystem in my yard is really coming alive this year. I’m not organic (I believe in science)- but through judicious use of pest controls, I think I have maintained a very good balance allowing for the beneficial creatures to thrive.
Now if I could only get rid of those noseeums…
Posted in Uncategorized | 4 Comments »

Some of last fall’s swiss chard. 8 beautiful plants. I didn’t eat a single leaf. Chard is now off of my ‘must plant’ list.
I’m slowing down the garden this year…on purpose. Maybe I want some beds to go fallow, maybe I’ve got other things to do with my time. Either way, I will be planting a bit less than usual.
But here is a list of what I am planting:
Squash
Peppers
Fruit
Tomatoes
 One of my onion boxes. You’ll notice that some onions are further along than others. Well, my young assistant has an affinity for pulling out young onion plants. In some cases, this is the third planting.
Wait…
Now I remember why I’m slowing down…
Two more little bean pods were added to the garden on April 19th..

Felix and Otto
Posted in Uncategorized | 2 Comments »
Psst…hey Buddy…you wanna buy a tomato cage? I’ve got some for you…cheap!
Yeah, you can buy tomato cages cheap. They just aren’t worth it. I’ve tried every single type of cage available at the store. Big wire cages, small wire cages…plastic cages that come apart….all of them. And they are all garbage! (The plastic ones are the best of the garbage.)
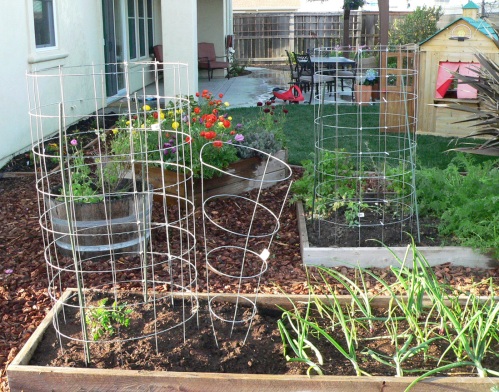
I decided I had seen something better in my father in law’s garden. So I did what I could to copy it. Here is what I came up with-
That’s me, proudly standing next to my new tomato cage. The cage is made from a ‘sheet’ of concrete reinforcing mesh. Each of these cost about $6.50. I simply rolled the mesh, overlapped one square, and used zip-ties to tie it together.
Easy peasy.
Okay, not really easy. I did one by myself, it was a total pain. My oldest critter helped me with the rest- much easier. Have a helper help you to help yourself.

My new cages are sooooooo much better compared to the junk they sell at the garden store. No comparison in size, or durability!
These new cages feel like they are built to last. The old cages had crummy welds, thin gauge wire, and were just generally lilliputian. I like my tomato cages like my wo…scratch that. But I do like them big and strong enough to support some thick and juicy Yolo County tomatoes. Baby got back…yard tomatoes! (Hey Becky, I think the other cages are built for New York tomatoes)

No children were harmed, but the neighbors stopped talking to me. Again. And why won’t they let their kids trick-or-treat at my house? I don’t care if it is April, I have a bag of candy waiting for them…
The new cage is big enough to catch some critters! And the large spaces between the wires mean you can pass a sandwich without the risking the rest of your body to attack! (This helps during the transport to the circus.)
Really, the big holes will be good enough to pull out one of those poorly-shaped heirloom monstrosities.

Screw the zip-ties, take a look at those flowers!
This is a closer picture of the zip-ties. Not exciting, but you’ll get an idea of how it goes. I trimmed the zip-ties after I was done, so it would look a little neater. Each of these cages took about 5 minutes to make.
.
In other news, the cupcake plants did great this year! Today was a pretty good harvest. I had enough to feed an entire party of pregnant, and not-pregnant, women.

You really have to make an effort to keep the bugs down…these are hard to wash off.
Next year I’m going to make room for an ice cream tree...it’s getting so expensive at the store!
Posted in Uncategorized | 2 Comments »
A post with more of my psuedo-science.
I’ve had this conversation a few times with people:
Me: “My soil sucks.”
Other person more blessed than I: “Oh, so does mine.”
Me: “I mean mine really sucks.”
OPMBTI: “Me too. I had a plant die once, and blah…blah…”
Really, my soil sucks. More than yours. I’m not trying to be dramatic here, I’m just telling the truth.
I know you don’t believe me, so I did some testing.
I swear I’ve felt Patrick Swayze’s ghost lurking around my yard. He loves the clay.
In the picture above, I have dug a hole to get some indigenous soil. This is the stickiest, most vile clay you have ever seen outside of pottery class. In fact, I am *sure* that this could be used to make pottery. Pottery clay has to come from somewhere- and this is it.
So I took a sample from the hole you see above, as well as three of my raised beds. I put the soil into jars with dish soap and water, then shook the crap out of them and waited for things to settle down.

From the left to he right, things are staring to settle down.
I noted which bed the samples were from.
The idea is that the soil will separate into different parts. The sand will all fall to the bottom first, because those are the largest and heaviest particles. Then you’ll get a layer of organic material and silt. And finally on the top, you will get clay. The clay particles are the smallest and stay suspended the longest.
You’ll end up with nice layers, just like a parfait. Then you compare the percentage of the different layers and proudly announce, “My soil is ‘silty clay loam”” while your fellow gardeners look on in awe.
And this is what happens with my indigenous soil. There’s no parfait at all. Just clay. 100% clay. No striation whatsoever. Garbage clay. Also, notice in the jar that there is still a huge ball of clay. That’s because this stuff won’t break up. I shook this jar for a good 10 minutes to get it this far. This is STICKY!
Really, my soil is worse than yours. If you don’t believe me, try this same test with your dirt. And if you do end up shaking the jar for 10 minutes, I recommend a few margaritas and loud music.
On the other hand, these three jars contain the soil from my vegetable beds. There are very small layers of sand and clay, but it is almost 100% organic material. This makes sense, since the beds are primarily compost.
Compost is great, but it needs to be replaced constantly. The level of soil in the beds drops dramatically each year as the carbohydrates break down into things like carbon dioxide and fairy dust. I need to add some sand.
 Oh! Pretty colors! Green is pH, the purple top is nitrogen. Blue is phosphorus and orange top is potassium.
Finally, I also tested for ph, nitrogen, phosphorous and potassium. I screwed up most of these tests, but I got some decent information. (Hint to other people out there…read ALL of the instructions before running these tests! And, buy two sets, so you can re-test after messing up the first time.)
I found that the pH in my raised beds is neutral, and my NPK numbers were a little low. I’m not surprised by that, since this was taken before I added any amendments to the soil. I was happy to find that my soil was not too heavy in any area, because that is a tougher problem to fix.
So when people ask me, “Hey! Why do you garden in raised beds?” my answer is simple: “Why does Superman wear a cape?”
Posted in Uncategorized | 5 Comments »
I’ve got my best crop of carrot that I’ve ever grown. I planted half a large packet of seeds (maybe 200?), and it seems like every single one grew into a good sized carrot.
So the next question is: what do I do with all of these carrots? First let’s see what we’re working with.

We’ve had a lot of rain lately, but not a single split carrot in the bunch.
The soil in the carrot bed is very nice fluffy loam. That makes for a lot of nice carrots. I get about 5% of them bifurcated. More common this year is when two carrots intertwine. I planted a lot of seeds randomly, in a small area. I think this harvest represents about one square foot of space.

I wash my carrots outside now. I am hoping to build an outdoor sink sometime this summer.
When I brought the carrots into the house, my wife’s only comment was, “Do you feel inadequate near those carrots?” Should I take that as a compliment to me as a gardener?
Back to the question: what do you do with two pounds of carrots?
You make carrot soup!

This is how I organize my cooking. It’s not just for the picture.
Carrot Soup
Ingredients, clockwise from the bottom of the picture
Chop the carrots. The ‘slice’ blade on your food processor will work well. Put carrots in a large metal soup pot with the broth, potato and salt. Bring to boil, then let it simmer for about 15 minutes.
About 10 minutes later, sautee the onions and garlic in the butter until the onions are transparent, and a few are browned.
Combine all ingredients into large pot, let it simmer for 20-60 minutes, depending on your schedule. It’s soup; you don’t need a timer.
Using an immersion blender, blend soup into a creamy soup (this is why you use a metal pot). Blend to your own liking, but I like to keep a little body, but no chunks.
Serve the soup as a main dish, or appetizer. Depending on your carrots, it can be very sweet tasting- it works great as an appetizer.
I ‘paired’ mine with onion rings for a delicious and complete dinner.
Posted in Uncategorized | Leave a Comment »